It's massive!! 70L woot!!
Wednesday, July 27, 2011
Saturday, July 2, 2011
American Boot to the Head - Failure or Fantastic?
Some of you might know my friends Eric and Adge from the States came over for a visit. While here Eric helped me brew up an American Style Pale Ale
The brew went great until the end. As some of my more avid readers out there will know, what do you mean there are not avid readers? Okay if you go back and read my old posts you'll see I have been getting brewing plumbing parts to help progress further... Anyhow, I had never used these before and most of them worked fantastically... Until the end
The whirlpool and side pickup to remove the wort from the kettle got blocked by the fresh hops and drastic measures were taken.
Infection was very high on the list to say the least....................
The fermentation kicked off fine and I left it for a solid 2 weeks + a few days for good measure.
I bottled all 30 some odd bottles with mixed feelings. That contamination at the end... I was worried...
Waiting a week I cracked on open just as a taste test, carbonation wasn't in full swing because I keep mine at a lower temp to get a finer bubble. Technical stuff aside I didn't expect any carbonation (This is important trust me you louts). What I got was the following
On the nose:
Banana
Sweet malt
A sure sign of contamination!
Taste:
Bitter and sweet
Malty but leaning towards the mild side
CARBONATION
My fears were confirmed. The whole batch was ruined!
However, I am ever the optimist. I let them sit for another 3 weeks just in case I was crazy. During those three weeks I organised all the beer being aged and this weekend I went out and saw something odd. One of the Session Pale Ale's had crap in the neck of the bottle. Inspecting others I found the same scattered through my collection.
Problem? Damn Woolworth's shitty caps and maybe my caper which is an old one handed down to me from Peter (Kasey's dad). Ultimately it's my fault for being slack and getting crappy caps at woolies. Damn them though!
So throwing two into the fridge I did a blind tasting on Kasey not telling her I thought the batch was infected (How nice am I?!) and she came back with
Lightly malty, Quite bitter but nice
I thought to myself... She is being nice this can't be right.... So I tried it and combining her notes and mine
On the nose:
Light malt, hint of hops
Taste:
Very bitter (Astringency )
Lightly malty flavor
Tasty!
More of the floral hops would have been nicer but this but since we didn't dry hop all our aroma would have come from the last 5 minutes on the brew and with all the screwing around at the end I think the temp was too high for too long before we could start cooling.
Still nice beer :)
For some of you who have made it this far down the screen, I have been testing my beers on anyone and everyone and to date we have two winners. One I think would fit in with Australia now and one which might take 5 years before its ready to hit the market.
Session Pale Ale 2 is a big hit
Eric Killer 2: Oil Barrel now to be named Oil Barrel because it didn't kill Eric (Sorry Adge, life insurance will have to come in another way).
Both are hoppy fantastic but Oil Barrel takes a hop head to suck it down and go back for a second.
Over and out!
The brew went great until the end. As some of my more avid readers out there will know, what do you mean there are not avid readers? Okay if you go back and read my old posts you'll see I have been getting brewing plumbing parts to help progress further... Anyhow, I had never used these before and most of them worked fantastically... Until the end
The whirlpool and side pickup to remove the wort from the kettle got blocked by the fresh hops and drastic measures were taken.
Infection was very high on the list to say the least....................
The fermentation kicked off fine and I left it for a solid 2 weeks + a few days for good measure.
I bottled all 30 some odd bottles with mixed feelings. That contamination at the end... I was worried...
Waiting a week I cracked on open just as a taste test, carbonation wasn't in full swing because I keep mine at a lower temp to get a finer bubble. Technical stuff aside I didn't expect any carbonation (This is important trust me you louts). What I got was the following
On the nose:
Banana
Sweet malt
A sure sign of contamination!
Taste:
Bitter and sweet
Malty but leaning towards the mild side
CARBONATION
My fears were confirmed. The whole batch was ruined!
However, I am ever the optimist. I let them sit for another 3 weeks just in case I was crazy. During those three weeks I organised all the beer being aged and this weekend I went out and saw something odd. One of the Session Pale Ale's had crap in the neck of the bottle. Inspecting others I found the same scattered through my collection.
Problem? Damn Woolworth's shitty caps and maybe my caper which is an old one handed down to me from Peter (Kasey's dad). Ultimately it's my fault for being slack and getting crappy caps at woolies. Damn them though!
So throwing two into the fridge I did a blind tasting on Kasey not telling her I thought the batch was infected (How nice am I?!) and she came back with
Lightly malty, Quite bitter but nice
I thought to myself... She is being nice this can't be right.... So I tried it and combining her notes and mine
On the nose:
Light malt, hint of hops
Taste:
Very bitter (Astringency )
Lightly malty flavor
Tasty!
More of the floral hops would have been nicer but this but since we didn't dry hop all our aroma would have come from the last 5 minutes on the brew and with all the screwing around at the end I think the temp was too high for too long before we could start cooling.
Still nice beer :)
For some of you who have made it this far down the screen, I have been testing my beers on anyone and everyone and to date we have two winners. One I think would fit in with Australia now and one which might take 5 years before its ready to hit the market.
Session Pale Ale 2 is a big hit
Eric Killer 2: Oil Barrel now to be named Oil Barrel because it didn't kill Eric (Sorry Adge, life insurance will have to come in another way).
Both are hoppy fantastic but Oil Barrel takes a hop head to suck it down and go back for a second.
Over and out!
Solar USB Charger - Results
I'll keep this short and sweet :)
I have put all the components into a case and done a days testing in the patchy cloudy day.
Full sun - 4.7 volts @ 197 milliamp WOOT!
Part shade - 4.7 volts @ 50-90 milliamp less woot
Shade - 2 - 4.7 volts @ 10 or less milliamp. Not worth mentioning
The charger hasn't done the 2000mA battery full but I tested my mp3 player and my mobile phone both were very happy to charge off it.
Phone reported 130mA coming through the charger (Android phones rock)
Thursday, June 30, 2011
Solar USB Charger - Assembled
My last post was on the parts and what I was trying to achieve. The parts arrived and I quickly got to work!
Here we have the parts, small huh!
We have 4 x 5v @ 100mA (.5 watt) solar panels
The 2000mA battery
The board which charges the battery and ultimately to the USB device
This is my 5v @ 100mA (.5 Watt) solar panel.
Soldered them in parallel to boost the amps from 100mA to 400mA
(5v @ 400mA which is 2 Watts)
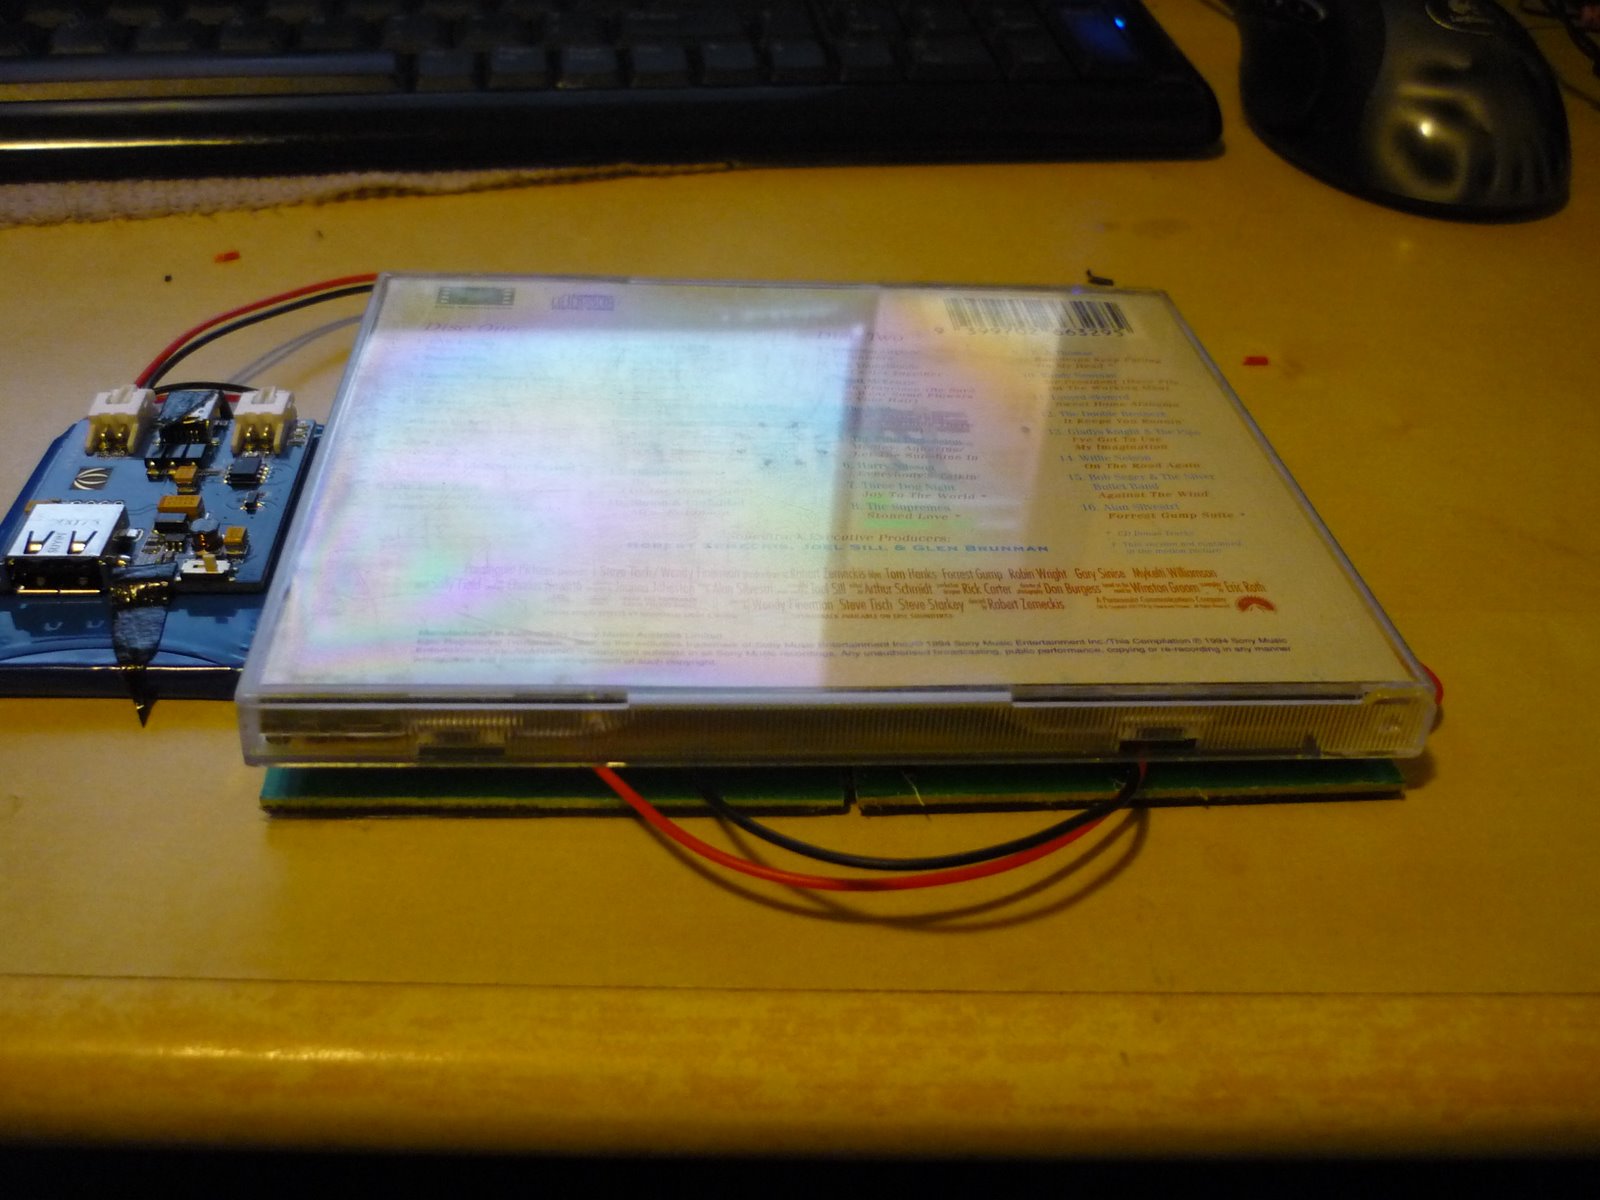
Here is the size of the panels, almost exactly the size a CD case.
Take it into the bathroom and I find a sleeping monkey! Saru! oh and the completed solar charger :P Is it working I wonder?
YES! (See Red light under the CH)
Awesome :D Next will be to take it out into the real world and time the charge.
Here we have the parts, small huh!
We have 4 x 5v @ 100mA (.5 watt) solar panels
The 2000mA battery
The board which charges the battery and ultimately to the USB device
Some perspective
This is my 5v @ 100mA (.5 Watt) solar panel.
Soldered them in parallel to boost the amps from 100mA to 400mA
(5v @ 400mA which is 2 Watts)
Here is the size of the panels, almost exactly the size a CD case.
Take it into the bathroom and I find a sleeping monkey! Saru! oh and the completed solar charger :P Is it working I wonder?
YES! (See Red light under the CH)
Awesome :D Next will be to take it out into the real world and time the charge.
Sunday, June 26, 2011
Solar USB Charger - Purchased Parts
Well folks I have decided to make my own solar USB charger with battery.
I have bought a usb solar charger from china and it works fine but the solar function on it is less then adequate for multiple USB devices and it seems to take a long time to charge up. Thinking what the heck I should be able to build something better right? I jumped in the deep end tonight and bought the following parts
So these solar panels are the correct voltage of 4.5-5.5v for USB charging and are a nice 100mA size. I got 4 to give me a max of around 2watts of charging goodness. The device I bought previously was between .5-.7w so my new kick ass setup should go 3-4x faster on the old charge :D
I added in a Polymer Lithium Ion Battery (Like in all your mobile/cell phones) to allow the gettup to bank some power.
All of this is nicely regulated by the Lipo Rider which will be doing all the power transfer from Solar to Battery and Battery to USB.
I'll take photos and see what the end result is :D Any ideas for cases / mounting for this charger?? The 4 panels I am thinking it put in some kind of plastic sleeve so I can fold them up into a nice travel pack.
Links
I have bought a usb solar charger from china and it works fine but the solar function on it is less then adequate for multiple USB devices and it seems to take a long time to charge up. Thinking what the heck I should be able to build something better right? I jumped in the deep end tonight and bought the following parts
| 4 x | 0.5w Solar Panel 55x70 - $23.80 ($5.95 each) SKU: POW112D2P |
| 2 x | Seeed JST 2 Pin power connector - $2.98 ($1.49 each) SKU: ARD110C4M |
| 1 x | Seeed Polymer Lithium Ion Battery - 2000mAh - $19.95 SKU: POW103C1P |
| 1 x | Seeed Lipo Rider (Charger) - $9.95 SKU: POW115D2P |
So these solar panels are the correct voltage of 4.5-5.5v for USB charging and are a nice 100mA size. I got 4 to give me a max of around 2watts of charging goodness. The device I bought previously was between .5-.7w so my new kick ass setup should go 3-4x faster on the old charge :D
I added in a Polymer Lithium Ion Battery (Like in all your mobile/cell phones) to allow the gettup to bank some power.
All of this is nicely regulated by the Lipo Rider which will be doing all the power transfer from Solar to Battery and Battery to USB.
I'll take photos and see what the end result is :D Any ideas for cases / mounting for this charger?? The 4 panels I am thinking it put in some kind of plastic sleeve so I can fold them up into a nice travel pack.
Links
Thursday, April 28, 2011
Esky (Cooler) conversion
Second post of the day! I was busy on the weekend after my parts from bargainfittings.com arrived :)
This was a pain in the ass build I don't mind saying. My esky has a HUGE wall and bulkhead kit was not long enough to make it through with enough threads. So out came the drill! Punching through with enough to absorb that nut shown below but not enough to go over the soldered washer.
Why did I do this? The solder is under the gasket show below and I wanted that outside not inside and it gave a little more room inside.
This might seem excessive, but I want to continue to use my esky for beer and ice! So I added a quick release and cap so I can disconnect my ball valve and barb while not brewing.
Internal is the braid, 2x SS Washers (Needed to chew up some thread) and a flat silicon gasket. The hex nut show in the soldered keg bulkhead at the top is in the esky wall, hence the drilling.
The outside is a silicon o ring with a third washer and the SS Camlock F style fitting Quick Disconnect. I put one on the floor on the left. The threads are on the concretion floor. The SS Camlock Dust Cap Style Quick Disconnect is shown attached to the esky keeping the water in and acting like a normal bung. On brew day I'll remove the dust cap and attach the ball valve show here in the picture with a SS Camlock B Style Quick Disconnect attached to the ball valve.
It will attach as so
Woot :D
When I get my next big kettle I'll be moving away from the esky to an insulated pot and all of this SS gear will transfer perfectly to the new mash tun.
No more (Or less) burned hands from wort transfer now! :)
This was a pain in the ass build I don't mind saying. My esky has a HUGE wall and bulkhead kit was not long enough to make it through with enough threads. So out came the drill! Punching through with enough to absorb that nut shown below but not enough to go over the soldered washer.
Why did I do this? The solder is under the gasket show below and I wanted that outside not inside and it gave a little more room inside.
3x 1/2" NPT Washer 304 stainless
1x Stainless steel mash braid
1x flat silicon gasket
1x silicon o ring
1x 1/2" SS Camlock Dust Cap Style Quick Disconnect
1x 1/2" SS Camlock F style fitting Quick Disconnect
1x 1/2" SS Camlock B Style Quick Disconnect
1x 3 - piece SS ball valve
1x 1/2" NPT FEMALE x 1/2" hose barb
Internal is the braid, 2x SS Washers (Needed to chew up some thread) and a flat silicon gasket. The hex nut show in the soldered keg bulkhead at the top is in the esky wall, hence the drilling.
The outside is a silicon o ring with a third washer and the SS Camlock F style fitting Quick Disconnect. I put one on the floor on the left. The threads are on the concretion floor. The SS Camlock Dust Cap Style Quick Disconnect is shown attached to the esky keeping the water in and acting like a normal bung. On brew day I'll remove the dust cap and attach the ball valve show here in the picture with a SS Camlock B Style Quick Disconnect attached to the ball valve.
It will attach as so
Woot :D
When I get my next big kettle I'll be moving away from the esky to an insulated pot and all of this SS gear will transfer perfectly to the new mash tun.
No more (Or less) burned hands from wort transfer now! :)
Hop Back Build
Bit of a long time since I have posted but here goes!
Today I got my parts from bargainfittings.com (Shame on your Australia for boosting prices. I kick you in the nads!)
Now on with the build!
304 Grade Stainless Steel
http://www.ashnjuls.com.au/Stainless-Steel-Food-Storage-Airtight-Canister-p/taihsinjuniorcanister1800.htm
Its a bit expensive but I believe in quality so well worth the price.
Next was the fittings.
2 x 1/2" NPT Female x 1/2" Barb
2 x 1/2" NPT flat silicone gasket
1 x 1/2" Silicon O Ring
2 x 1/2" NPS locknut
1 x 1/2" NPT nipple 2" long
1 x Keg Bulk Head Kit
Now if you have never worked with a curve surface and SS, I suggest extreme caution. Also, get as much SS 316 as possible, 304 is the next best thing but I wouldn't go any lower then that. Go for quality! Okay enough of the public service announcements on to the construction
I started a pilot hole with a smaller drill on the upper side of the canister. From there I got my step bit for drilling SS, should be able to find these at any big hardware store or the fittings place listed above.
After burning yourself a few times on red hot SS metal you should have a hole about 1/2" around. Keep checking as you drill. Then get a grinder for removing any nasty SS edges. Its hard I know, I spent good part of 2 hours drilling, grinding and polishing. The second hole is at the bottom. Here is a photo to help you on your mental imaging.
Now time to attach the plumbing!
To the top section I used the 2" nipple and put the barb naked on the outside without a gasket, I don't think it will need one but time will tell. Inside I put a silicon o ring because I couldn't get the gasket to fit and a locknut to tighten it all down. It was a hard fit but I got it on :)
I did this so the hot wort would spill out into the middle of the canister instead of close to the side of the canister and might not take advantage of all of the hops.
The bottom is a locknut and gasket inside and the outside is another gasket with a barb on the end. The connecting piece is part of the keg bulk head kit
Today I got my parts from bargainfittings.com (Shame on your Australia for boosting prices. I kick you in the nads!)
Now on with the build!
304 Grade Stainless Steel
http://www.ashnjuls.com.au/Stainless-Steel-Food-Storage-Airtight-Canister-p/taihsinjuniorcanister1800.htm
Its a bit expensive but I believe in quality so well worth the price.
Next was the fittings.
2 x 1/2" NPT Female x 1/2" Barb
2 x 1/2" NPT flat silicone gasket
1 x 1/2" Silicon O Ring
2 x 1/2" NPS locknut
1 x 1/2" NPT nipple 2" long
1 x Keg Bulk Head Kit
Now if you have never worked with a curve surface and SS, I suggest extreme caution. Also, get as much SS 316 as possible, 304 is the next best thing but I wouldn't go any lower then that. Go for quality! Okay enough of the public service announcements on to the construction
I started a pilot hole with a smaller drill on the upper side of the canister. From there I got my step bit for drilling SS, should be able to find these at any big hardware store or the fittings place listed above.
After burning yourself a few times on red hot SS metal you should have a hole about 1/2" around. Keep checking as you drill. Then get a grinder for removing any nasty SS edges. Its hard I know, I spent good part of 2 hours drilling, grinding and polishing. The second hole is at the bottom. Here is a photo to help you on your mental imaging.
Now time to attach the plumbing!
To the top section I used the 2" nipple and put the barb naked on the outside without a gasket, I don't think it will need one but time will tell. Inside I put a silicon o ring because I couldn't get the gasket to fit and a locknut to tighten it all down. It was a hard fit but I got it on :)
I did this so the hot wort would spill out into the middle of the canister instead of close to the side of the canister and might not take advantage of all of the hops.
The bottom is a locknut and gasket inside and the outside is another gasket with a barb on the end. The connecting piece is part of the keg bulk head kit
As this is linked image I'll drop them a line
I have done water tests with it and it seems to hold just fine! Perfect.
Subscribe to:
Posts (Atom)