Here I am day two.... I made custom small beef balls and froze them for use later...
I thought to grab some of these precooked beefy goodness and add some greens and call it a victory?
Gourmet Daughter Verdict: This is plain and not tasty! I'll eat a little but....
So I quickly changed tact and came up with the following beef and breed!
What you will need:
Pre-cooked beef
1/2 a tomato
Dried oregano
Peas
Sourdough bread
1. Toast bread
2. In a pan (Stainless Steal, don't use cast iron the acidity will strip the coating on cast iron) add beef, tomato, peas and dried oregano, add some water to loosen it all up and cook through for 2-3 mins.
3. Chop up bread into baby fist size chunks
4. Add bread to mix, it should absorb all the liquid in the pot and beef should stick to the bread. Peas will be seperate and baby will pick them up.
Gourmet Daughter Verdict: Much better. Yum yum yum
Tuesday, September 23, 2014
Baby food day 1 - tuna and hummus
It has been a long time, maybe even year(s) since the last post but now I feel it is time to write.
Our lovely daughter has decided overnight to reject all baby food and wants to feed herself. This proposes a number of challenges...
I'm looking after her for the next two weeks and coming up with recipies which our gourmet of a daughter accepts.
Today's is Tuna and Hummus. A take on the american classic of Tuna and Mayo. This is healthier and a bit more bite to it! :) Just mix in a bowel tuna and hummus still you can form it solid and little hands can pick it up. Easy!
Daughters reaction "Love this stuff!"
Thursday, October 27, 2011
How to pour an over carbonated beer
Here is a short video on the best way I have found to poor a beer which is over carbonated.
This is a American Style Dark IPA (Cascadia Dark Ale) which is over a year old now and damn damn tasty.
A side note while you watch the video if you get bored....
I was reading about seaweed (of course I was right?) and it turns out that seaweed improves with age as long as it is stored properly. "becoming sweeter as complex carbohydrates fragment to simple sugars, and meatier as proteins fragment to amino acids." Very interesting. This would apply to many things... Something to think about.
Saturday, September 24, 2011


Wednesday, July 27, 2011


Saturday, July 2, 2011
American Boot to the Head - Failure or Fantastic?
Some of you might know my friends Eric and Adge from the States came over for a visit. While here Eric helped me brew up an American Style Pale Ale
The brew went great until the end. As some of my more avid readers out there will know, what do you mean there are not avid readers? Okay if you go back and read my old posts you'll see I have been getting brewing plumbing parts to help progress further... Anyhow, I had never used these before and most of them worked fantastically... Until the end
The whirlpool and side pickup to remove the wort from the kettle got blocked by the fresh hops and drastic measures were taken.
Infection was very high on the list to say the least....................
The fermentation kicked off fine and I left it for a solid 2 weeks + a few days for good measure.
I bottled all 30 some odd bottles with mixed feelings. That contamination at the end... I was worried...
Waiting a week I cracked on open just as a taste test, carbonation wasn't in full swing because I keep mine at a lower temp to get a finer bubble. Technical stuff aside I didn't expect any carbonation (This is important trust me you louts). What I got was the following
On the nose:
Banana
Sweet malt
A sure sign of contamination!
Taste:
Bitter and sweet
Malty but leaning towards the mild side
CARBONATION
My fears were confirmed. The whole batch was ruined!
However, I am ever the optimist. I let them sit for another 3 weeks just in case I was crazy. During those three weeks I organised all the beer being aged and this weekend I went out and saw something odd. One of the Session Pale Ale's had crap in the neck of the bottle. Inspecting others I found the same scattered through my collection.
Problem? Damn Woolworth's shitty caps and maybe my caper which is an old one handed down to me from Peter (Kasey's dad). Ultimately it's my fault for being slack and getting crappy caps at woolies. Damn them though!
So throwing two into the fridge I did a blind tasting on Kasey not telling her I thought the batch was infected (How nice am I?!) and she came back with
Lightly malty, Quite bitter but nice
I thought to myself... She is being nice this can't be right.... So I tried it and combining her notes and mine
On the nose:
Light malt, hint of hops
Taste:
Very bitter (Astringency )
Lightly malty flavor
Tasty!
More of the floral hops would have been nicer but this but since we didn't dry hop all our aroma would have come from the last 5 minutes on the brew and with all the screwing around at the end I think the temp was too high for too long before we could start cooling.
Still nice beer :)
For some of you who have made it this far down the screen, I have been testing my beers on anyone and everyone and to date we have two winners. One I think would fit in with Australia now and one which might take 5 years before its ready to hit the market.
Session Pale Ale 2 is a big hit
Eric Killer 2: Oil Barrel now to be named Oil Barrel because it didn't kill Eric (Sorry Adge, life insurance will have to come in another way).
Both are hoppy fantastic but Oil Barrel takes a hop head to suck it down and go back for a second.
Over and out!
Solar USB Charger - Results
I'll keep this short and sweet :)
I have put all the components into a case and done a days testing in the patchy cloudy day.
Full sun - 4.7 volts @ 197 milliamp WOOT!
Part shade - 4.7 volts @ 50-90 milliamp less woot
Shade - 2 - 4.7 volts @ 10 or less milliamp. Not worth mentioning
The charger hasn't done the 2000mA battery full but I tested my mp3 player and my mobile phone both were very happy to charge off it.
Phone reported 130mA coming through the charger (Android phones rock)
Thursday, June 30, 2011
Solar USB Charger - Assembled
My last post was on the parts and what I was trying to achieve. The parts arrived and I quickly got to work!
Here we have the parts, small huh!
We have 4 x 5v @ 100mA (.5 watt) solar panels
The 2000mA battery
The board which charges the battery and ultimately to the USB device


This is my 5v @ 100mA (.5 Watt) solar panel.

Soldered them in parallel to boost the amps from 100mA to 400mA
(5v @ 400mA which is 2 Watts)

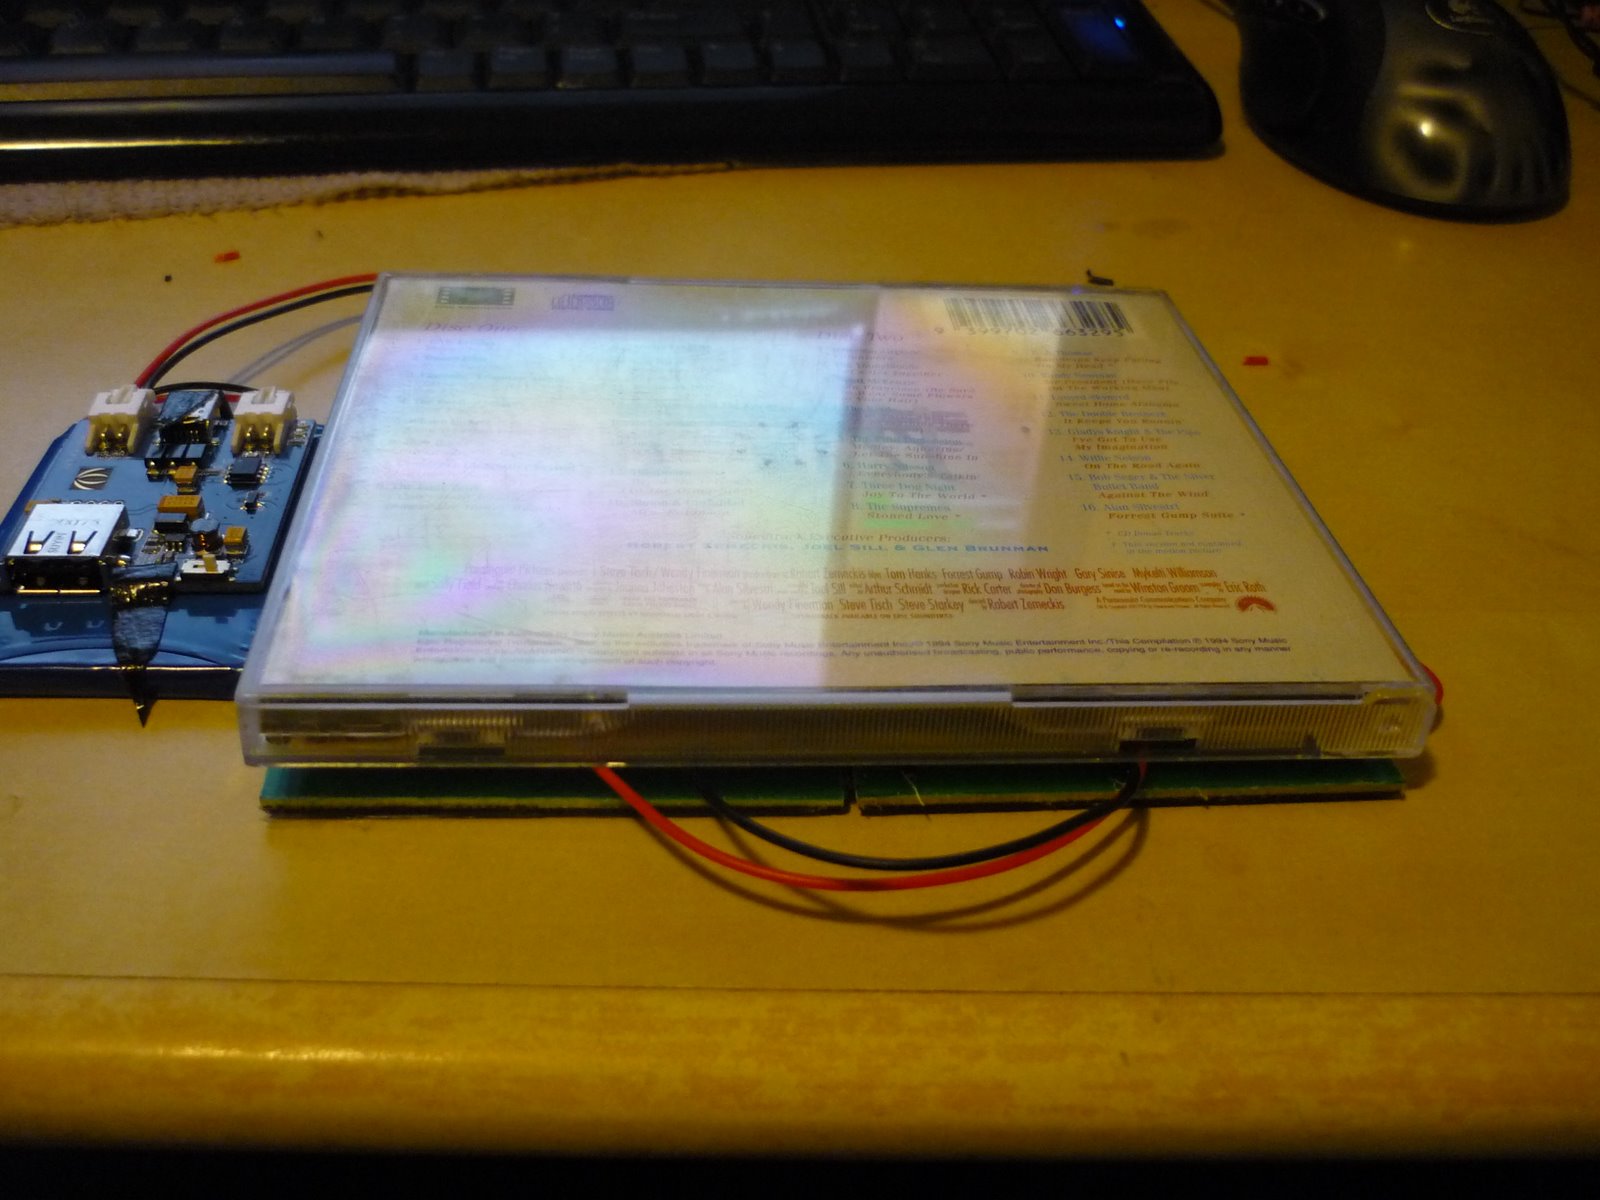
Here is the size of the panels, almost exactly the size a CD case.

Take it into the bathroom and I find a sleeping monkey! Saru! oh and the completed solar charger :P Is it working I wonder?

YES! (See Red light under the CH)

Awesome :D Next will be to take it out into the real world and time the charge.
Here we have the parts, small huh!
We have 4 x 5v @ 100mA (.5 watt) solar panels
The 2000mA battery
The board which charges the battery and ultimately to the USB device

Some perspective

This is my 5v @ 100mA (.5 Watt) solar panel.

Soldered them in parallel to boost the amps from 100mA to 400mA
(5v @ 400mA which is 2 Watts)

Here is the size of the panels, almost exactly the size a CD case.
Take it into the bathroom and I find a sleeping monkey! Saru! oh and the completed solar charger :P Is it working I wonder?

YES! (See Red light under the CH)

Awesome :D Next will be to take it out into the real world and time the charge.
Sunday, June 26, 2011
Solar USB Charger - Purchased Parts
Well folks I have decided to make my own solar USB charger with battery.
I have bought a usb solar charger from china and it works fine but the solar function on it is less then adequate for multiple USB devices and it seems to take a long time to charge up. Thinking what the heck I should be able to build something better right? I jumped in the deep end tonight and bought the following parts
So these solar panels are the correct voltage of 4.5-5.5v for USB charging and are a nice 100mA size. I got 4 to give me a max of around 2watts of charging goodness. The device I bought previously was between .5-.7w so my new kick ass setup should go 3-4x faster on the old charge :D
I added in a Polymer Lithium Ion Battery (Like in all your mobile/cell phones) to allow the gettup to bank some power.
All of this is nicely regulated by the Lipo Rider which will be doing all the power transfer from Solar to Battery and Battery to USB.
I'll take photos and see what the end result is :D Any ideas for cases / mounting for this charger?? The 4 panels I am thinking it put in some kind of plastic sleeve so I can fold them up into a nice travel pack.
Links
I have bought a usb solar charger from china and it works fine but the solar function on it is less then adequate for multiple USB devices and it seems to take a long time to charge up. Thinking what the heck I should be able to build something better right? I jumped in the deep end tonight and bought the following parts
| 4 x | 0.5w Solar Panel 55x70 - $23.80 ($5.95 each) SKU: POW112D2P |
| 2 x | Seeed JST 2 Pin power connector - $2.98 ($1.49 each) SKU: ARD110C4M |
| 1 x | Seeed Polymer Lithium Ion Battery - 2000mAh - $19.95 SKU: POW103C1P |
| 1 x | Seeed Lipo Rider (Charger) - $9.95 SKU: POW115D2P |
So these solar panels are the correct voltage of 4.5-5.5v for USB charging and are a nice 100mA size. I got 4 to give me a max of around 2watts of charging goodness. The device I bought previously was between .5-.7w so my new kick ass setup should go 3-4x faster on the old charge :D
I added in a Polymer Lithium Ion Battery (Like in all your mobile/cell phones) to allow the gettup to bank some power.
All of this is nicely regulated by the Lipo Rider which will be doing all the power transfer from Solar to Battery and Battery to USB.
I'll take photos and see what the end result is :D Any ideas for cases / mounting for this charger?? The 4 panels I am thinking it put in some kind of plastic sleeve so I can fold them up into a nice travel pack.
Links
Thursday, April 28, 2011
Esky (Cooler) conversion
Second post of the day! I was busy on the weekend after my parts from bargainfittings.com arrived :)
This was a pain in the ass build I don't mind saying. My esky has a HUGE wall and bulkhead kit was not long enough to make it through with enough threads. So out came the drill! Punching through with enough to absorb that nut shown below but not enough to go over the soldered washer.
Why did I do this? The solder is under the gasket show below and I wanted that outside not inside and it gave a little more room inside.

This might seem excessive, but I want to continue to use my esky for beer and ice! So I added a quick release and cap so I can disconnect my ball valve and barb while not brewing.
 Internal is the braid, 2x SS Washers (Needed to chew up some thread) and a flat silicon gasket. The hex nut show in the soldered keg bulkhead at the top is in the esky wall, hence the drilling.
 The outside is a silicon o ring with a third washer and the SS Camlock F style fitting Quick Disconnect. I put one on the floor on the left. The threads are on the concretion floor. The SS Camlock Dust Cap Style Quick Disconnect is shown attached to the esky keeping the water in and acting like a normal bung. On brew day I'll remove the dust cap and attach the ball valve show here in the picture with a SS Camlock B Style Quick Disconnect attached to the ball valve.
It will attach as so

Woot :D
When I get my next big kettle I'll be moving away from the esky to an insulated pot and all of this SS gear will transfer perfectly to the new mash tun.
No more (Or less) burned hands from wort transfer now! :)
This was a pain in the ass build I don't mind saying. My esky has a HUGE wall and bulkhead kit was not long enough to make it through with enough threads. So out came the drill! Punching through with enough to absorb that nut shown below but not enough to go over the soldered washer.
Why did I do this? The solder is under the gasket show below and I wanted that outside not inside and it gave a little more room inside.

3x 1/2" NPT Washer 304 stainless
1x Stainless steel mash braid
1x flat silicon gasket
1x silicon o ring
1x 1/2" SS Camlock Dust Cap Style Quick Disconnect
1x 1/2" SS Camlock F style fitting Quick Disconnect
1x 1/2" SS Camlock B Style Quick Disconnect
1x 3 - piece SS ball valve
1x 1/2" NPT FEMALE x 1/2" hose barb


It will attach as so

Woot :D
When I get my next big kettle I'll be moving away from the esky to an insulated pot and all of this SS gear will transfer perfectly to the new mash tun.
No more (Or less) burned hands from wort transfer now! :)
Hop Back Build
Bit of a long time since I have posted but here goes!
Today I got my parts from bargainfittings.com (Shame on your Australia for boosting prices. I kick you in the nads!)
Now on with the build!
304 Grade Stainless Steel
http://www.ashnjuls.com.au/Stainless-Steel-Food-Storage-Airtight-Canister-p/taihsinjuniorcanister1800.htm

Its a bit expensive but I believe in quality so well worth the price.
Next was the fittings.
2 x 1/2" NPT Female x 1/2" Barb
2 x 1/2" NPT flat silicone gasket
1 x 1/2" Silicon O Ring
2 x 1/2" NPS locknut
1 x 1/2" NPT nipple 2" long
1 x Keg Bulk Head Kit
Now if you have never worked with a curve surface and SS, I suggest extreme caution. Also, get as much SS 316 as possible, 304 is the next best thing but I wouldn't go any lower then that. Go for quality! Okay enough of the public service announcements on to the construction
I started a pilot hole with a smaller drill on the upper side of the canister. From there I got my step bit for drilling SS, should be able to find these at any big hardware store or the fittings place listed above.
After burning yourself a few times on red hot SS metal you should have a hole about 1/2" around. Keep checking as you drill. Then get a grinder for removing any nasty SS edges. Its hard I know, I spent good part of 2 hours drilling, grinding and polishing. The second hole is at the bottom. Here is a photo to help you on your mental imaging.

Now time to attach the plumbing!
To the top section I used the 2" nipple and put the barb naked on the outside without a gasket, I don't think it will need one but time will tell. Inside I put a silicon o ring because I couldn't get the gasket to fit and a locknut to tighten it all down. It was a hard fit but I got it on :)

I did this so the hot wort would spill out into the middle of the canister instead of close to the side of the canister and might not take advantage of all of the hops.
The bottom is a locknut and gasket inside and the outside is another gasket with a barb on the end. The connecting piece is part of the keg bulk head kit
As this is linked image I'll drop them a line
I have done water tests with it and it seems to hold just fine! Perfect.
Tuesday, February 22, 2011
Europe Trip - Paris Day 2
Europe Trip Posts
(As I have allergies today I thought I'll try and knock a few of these Paris posts out :) )
So we came up with a few rules/games which makes traveling a lot more fun and helps you not being an ass in a foreign country.
Flash back to Japan; In Japan we used to keep score with Bunka points, (Bunka mean culture), so every time we did something very Japanese we gained Bunka points. Eating pickled mountain vegetables in a Buddhists monetary? Heaps of bunka points. J-Walking or doing things which goes against the grain of the local culture - bunka points lost!
In Paris we didn't have as long as in Japan so we shortened the competitions down to a 1 vs 1 outing. So we needed to hit up the boulangerie and the grocer, Kasey would take one and I would take the other. The person who got away using the least amount of english and used french instead wins! Simple. Its easy to pair things like this up, motivates everyone to try and be more sensitive and accepted. It works like a champ trust me.
So the break down of the rules/games for Paris.
View Larger Map
So we came up with a few rules/games which makes traveling a lot more fun and helps you not being an ass in a foreign country.
Flash back to Japan; In Japan we used to keep score with Bunka points, (Bunka mean culture), so every time we did something very Japanese we gained Bunka points. Eating pickled mountain vegetables in a Buddhists monetary? Heaps of bunka points. J-Walking or doing things which goes against the grain of the local culture - bunka points lost!
In Paris we didn't have as long as in Japan so we shortened the competitions down to a 1 vs 1 outing. So we needed to hit up the boulangerie and the grocer, Kasey would take one and I would take the other. The person who got away using the least amount of english and used french instead wins! Simple. Its easy to pair things like this up, motivates everyone to try and be more sensitive and accepted. It works like a champ trust me.
So the break down of the rules/games for Paris.
- Win against each other by using French and not English in dealings with people
- Never eat at the same place twice; this keeps you from going to the same western hole over and over. You McDonald's people should be ashamed.
- Always try something new on the menu, the more extreme the better! Go for it.
View Larger Map
We woke up on our first full day of Paris,France fun. What to do first? Go out and get some breakfast of course. So down our little street we went to the first boulangerie, where we stocked up on bread, croissants; then a quick cut across the road to the tinny grocery store for wine, coffee, tomatoes, etc. I won this round the outings, using more French then Kasey :D Go me! Its okay this victory is short lived.
View Larger Map

Simple but tasty! And yes, wine with every meal :P (If you look hard you can see the glass.
And a little lay down to let everything settle

And a little lay down to let everything settle

Once we were fed and rested it was time to head out and into the wide world of Paris. Our first stop was to look at the huge line of people waiting to get into Notre Dam which we saw everyday as we left the islands.

Passing the crowds we headed to the city's IVe arrondissement (The whole city is broken up into arrondissements)
 See the little islands in the river in the middle? We are on the bottom right one heading to the IV Arrondissement.
There we checked out the Hôtel de Ville, and took some fun pics :)
Weeeeeeeeeeeeee!!!

(Statue representing Art)


Passing the crowds we headed to the city's IVe arrondissement (The whole city is broken up into arrondissements)

There we checked out the Hôtel de Ville, and took some fun pics :)
Weeeeeeeeeeeeee!!!

(Statue representing Art)

(Statue representing Science)

After a fun few shots we headed in a random direction and came upon the most hiddious building I have ever seen Centre national d'Art et de Culture Georges Pompidou

Terrible! But I know a lot of people find it fascinating. Ohh and the question I asked was "Is it finished", I received a punch in the shoulder saying "Be nice" which means it is finished! Imagine that.....

So we hurried away before getting some sort of urge to go inside and down a random street (No this is not an alleyway) where we found a Japanese Calligraphy shop! (Japan and France are very close and trade a lot of culture/food). The shop had everything I could have wanted to do some shodo but I was worried none of it would survive the trip back. They had some really nice paper in there.... I'll have to go back and pick some up ;-)
Leaving the paper shop Kasey being a magnet for disaster found some Paris graphite which is a special kind of paint they fling at things. In a most Hermione voice she started to tell me about this paint and the culture behind it as she steps in it and then promptly touches her shoes and smears it all over the shoes and her hands. Being oil based (As she was telling me) its very hard to get it off!

Then of course it starts to poor :) Rushing back the way we came we headed to a large department store which sold paint thinner in the art section; As all new up coming artists come to Paris there is loads of expensive and nasty painting supplies. I wouldn't paint some of my miniatures with the stuff they were selling at top prices! Anyhow, we bought a bottle of thinner and headed back to the apartment. Kasey kept the shoes past this trip as a memento; DURP!
For lunch we decided to duck into the cheese and cured meat shop along our street. Enter the shop was an assault on the senses, since the cheeses and meats are allowed to age and mature in the open air even in the shop. The jolly fellow who ran the shop was a lot of fun, as far as we could tell he didn't speak any English or refused to but he was a kind fellow and helped us through naming each of the cheeses and meats until we left with a booty of salami, two goat cheeses (Fresh), and some wine. Rushing back like kids with a new toy we set up the table for lunch

If you can not tell, the foodie stuff alone is worth it for us on this trip.
With full bellies we resolved to resting and planning our future trips and what we wanted to do.
That evening we went and had pizza with a sangiovese which was OK by every day standards but wasn't the pinnacle of foodie enjoyment.
We had an early night because we needed to be up and out of the apartment at 5am the next morning to make the first mas at Notre Dam, as it was Easter. Thats some freak'n culture points there.
Friday, February 4, 2011
100 IBU - Eric Killer v1
Holas all!
In tribute to Eric and his love o' hops I am questing to make the killer of all super hop beers. To this end I created a beer which has somewhere in the range of 100IBU. To give you an idea of what this means most PA have an IBU between 30-50, an Indian Pale Ale around 50-75 and above that is some strong stuff!
So if you think your hopped up enough come have one! I have about 2 cases worth of this deep amber liquid.
Next on the list is Eric Killer 2: Oil Barrel. I am making an oily beer, the hop oils will be just sitting in suspension ohhhh gonna be nice.
Whaaa? Just want to get on with the beer porn? Right!
Today I take the cap off the first Eric Killer and since I got some good comments about the back drop I went back outside :D


Among the hops this beer is happy
BTW just for fun here is an old picture of our front area before we got in there planted another tree, bamboo and all that other good jazz out there

Thursday, February 3, 2011
Ozzie Session Pale Ale
Well it is time for more beer porn.
Thats right, I take you to see some naked beer and you all love it!
The latest on the camera is what I am calling a Session Pale Ale but really it is what I hope to be a Gate Way drug... err beer for ozzies. Something that the general populous (No you good craft ozzie beer drinkers need not take offence) will warm to the wonders of bittering, flavorsome and aroma beers with hops.
So I am questing for the the pale ale that ozzies will consume vast quantities of in a single sitting. That will have them hopping (hehe) for more IBU!

Look tasty? Ozzie? Come round and drink this stuff! Even if your a seasoned beer drinker I need opinions people
Thursday, October 7, 2010
Sunday, August 15, 2010
Brewing Day - Pale Ale
Well its brew day and I thought to show off some of my gear I am using these days.
I am still slumming it with a 15 liter pot and 5 liter pot. I have moved my brew bag into an eski. This will be the first time I have done this but the theory is well thought out ;-)
After the water is done its time to prep the eski.

After this its time to add the water to the grain and watch the magic happen!
Yummy
After I drained the wort I end up with two pots full of sugary goodness!

And I get to use my new toy! This lets me measure the sugar content to tell me about what Alc % the beer will be.

Get a reading of 13 and convert that into SG to find I have about a 5.5% beer on the brew :)
Next up to add the hops as it boils. Digital scale, 20 bones! Not bad eh. It only goes up to 5kg but if I am doing 5kg of hops I am gonna buy a better scale.

While brewing I needed to get dinner on so slamo!

Note the beer in the picture is my last Pale Ale :) Ohh and the excellent salami there on the cutting board. Awesome.
After 90 minutes of boiling the wort and hops (and eating the pizza) was time to try out the new immersion chiller!

Doesn't look very swish but there is a small pond pump in there feeding ice cold water through my Stainless Steel coil and as it cools the brew the hot water comes back out the other end and back into the eski.
Brought my wort from near boiling to 19C in about 50 minutes. I think it would have gone faster if I would have had smaller ice and remembered to add salt to the water. Next time.
For all you water conservationists out there, I am use the water in the eski to re-make the ice used. Neat eh? I'll change the water out when it starts to smell.
Last thing.
I am doing an Open Fermentation on this bad boy. I will be leaving the top off the fermenter for 3 days. This should produce more esters (fruity charateristics) and then I'll seal it up for the long haul of another week.
Here is the recipe I did today if anyone out there is following along.
| Amount | Item | Type | % or IBU |
|---|---|---|---|
| 5.00 kg | Pale Malt (2 Row) UK (6.3 EBC) | Grain | 96.2 % |
| 0.20 kg | Caramel Wheat Malt (90.6 EBC) | Grain | 3.9 % |
| 25.00 gm | Magnum [14.00%] (60 min) | Hops | 38.9 IBU |
| 20.00 gm | Pearle [8.00%] (60 min) | Hops | 17.8 IBU |
| 30.00 gm | Cascade [5.50%] (3 min) | Hops | 2.3 IBU |
| 1 Pkgs | Australian Ale Yeast (White Labs #WLP009) | Yeast-Ale |
| Estimated Original Gravity: 1.058 SG (1.045-1.060 SG) | Measured Original Gravity: 1.052 SG |
| Estimated Final Gravity: 1.015 SG (1.010-1.015 SG) | Measured Final Gravity: 1.010 SG |
| Estimated Color: 14.8 EBC (9.9-27.6 EBC) | Color [Color] |
| Bitterness: 58.9 IBU (30.0-50.0 IBU) | Alpha Acid Units: 3.4 AAU |
| Estimated Alcohol by Volume: 5.6 % (4.5-6.0 %) | Actual Alcohol by Volume: 5.5 % |
Lastly. I am also doing an experiment using the yeast from the bottles of my last pale ale which is the Australian Ale Yeast listed above. It should be fine but only time will tell.
The next brew will be my 2nd brew of a Irish Red Ale. It will from now on be called the Irish Rebellion II : Yeast's Revenge
Brew out.
Friday, June 25, 2010

Sunday, June 20, 2010
Europe Trip - Paris Day 1
Europe Trip Posts
Journey Begins
Vienna Day 1
Vienna Day 2
Vienna Day 3
Paris Day 1 (This Post)
Paris Day 2
We woke up a bit late on the morning we were to head to Paris so it was all hands to the main decks! We packed, crammed and stuffed. We hauled our stuff to the station, pulled out some more cash to pay for the apartment once we got to Paris and waited for our train to the airport.
Arriving at the airport we went to the British Airways line and waited... Like most dealings with these clowns there was no one there.
Little history here before we get into the fun. We were leaving Vienna and flying to London. We were then getting on another TICKET flight from London to Pairs. What this means is they don't check your bags through since it is two completely different tickets. However, I wanted to see if I could charm and wile my way into getting the bags routed through (All their systems are integrated together).
An hour and half before the flight they saunter up and open. They start jabbering about using this automated terminals but I have a special request! So I iggnored them and went up and said "Hello I would like..." And they cut me off saying I have to use the terminals. I tried to explain yes... I know but... TERMINALS! YOU MUST USE!.
Fine.... I'll do the damn terminals. Jabbing at them in anger and in random fashion the lady comes from behind the counter over to the terminal and punches all the stuff in for me...................................................................................................................... My blood is boiling. Its simmering away as she DOES HER JOB. Now I ask... what is the difference between her just doing that behind the counter and coming over to work the terminal?
So I snatch our boarding passes and get back in line. You didn't think I was going to give up on this bag transfer thing did you?
I get another lady since the first is off doing all the Self-Help terminals for other people :D
I give her my pass and start explaining I wanted our bags transferred to another flight and I tried to keep the ire out of my voice. She looked a bit dubious but started clicking away madly. I felt like I was in Meet the Folkers movie. She asked for paperwork and passports and continued to madly click away. Then out of the blue she hands over 4 boarding passes, takes our bags and puts the labels on to transfer them to Paris! Wow this lady was good! I looked at the boarding passes and she even issues our boarding passes from the other flight! Woot! I felt very grateful at this point.
Giving the Self-Help terminals one last dirty look we left for the plane.
Ohh you think it all ends here with us arriving in Paris without incident, think again my friend.
Arriving in the most hated of terminals and home of British Airways, Heathrow London. We didn't have to get our check-in luggage because that was kindly routed through for us but we still had to go through the ridiculous security again. We got into a massive line and waited... We got to the security area and some how this middle eastern fellow got between Kasey and I. She went through with her carry on and popped out the other side, the fellow before me went through and then my backpack and I went through.
Security stopped the fellow in front of me so I had to stop since I couldn't go around.
"Sir is this your bag" he asked the middle eastern fellow and he was holding up my backpack.
I said clearly "No that's my bag"
The fellow in front of me said "No" and the secuirty officer became louder and more aggressive saying "Sir is this your bag?!?!?" I more loudly said "No that is mine!" while the fellow in front kept saying no. The security officer started yelling at this fellow and I finally yelled back "ITS MINE!! My Bag, Not His MINE!"
Looking a little shocked he put my bag down and told me to wait over at the end. The middle eastern fellow left...
Ohh did I mention because of the efficacy and speed we now had 10 minutes before our flight left?
So I am waiting.. And waiting... no one is doing anything! I try to catch someones eye but nothing is working. Finally I said, in what I hopped was a kind but clear voice, "Excuse me, can someone check my bag I only have (Looks at clock) 8 minutes till my flight. Please". There was also a sign saying "If your going to to gate BLAH then make sure you have 10 minutes. Kasey saw the sign and ran off to find what gate. Returning of course to say it was the gate indicated on the sign.
A lady brings my bag over with a disgusted look on her face and says "We have to have a security officer go through it." I tried to calm down and said "Would it help if I took everything out?" She didn't say anything but took my bag and went to go talk to someone. Why was everyone carrying my bag around if it was to contain some spurious item?!
She comes back and said "Fine empty the bag into this box. We'll run it through again". 5 minutes till the plane leaves........
I start dumping shit out, NDS, snacks, MP3 Player, book and some more random crap. "There there, can you run that through please." 4 minutes to go.
They run the box of crap through and identified what was causing all the problems. A metal bookmark my mom gave me. This book mark has traveled through USA customs on at least six occasions, USA CUSTOMS, shoot you in the face customs, strip search and anal probe customs and these people pull me up on a book mark.
At this point they gave me a mini lecture about dangerous items.
GIMME THAT! Shit...
 Kasey and I didn't bother to put the dangrous items back into my backpack but loaded up our arms in one last look to her in a your a moron look and ran. RAN LIKE THE WIND. We ran like Harry Potter from Voldemort. We ran and ran and ran and just barely made it onto the plane.
We left the saddest place on earth and was in the air to France!
Arriving in France our bags where there before we got off the plane ready for us and off we went! We grabbed train tickets (Cabs are for wusses) and headed into the heart of Paris.
It was about 9pm and we dragged our bags down some fantastic streets and past Notre Dame which due to the light rain the gargoyles were dripping water out of their mouths. What a sight!

Meeting up with the lady who we are renting the apartment from we headed to our place
(This photo was days later but it is the same street)
 This was the front door to the building :D This was also taken days later
 Arriving finally we were confronted with old 18th century stairs! So one at a time I hauled our massive bags up three flights of old spring stairs

Here is a video of us going down the stairs and out into the court yard Click on Image to watch video
After we got all our gear the American lady (ohh I forgot to mention that, she was super American, I am not sure she realized I was a fellow countryman!) began to explain how the light switches work and at the end asked if we knew how microwaves worked. Too much for me... I whipped out the cash handed it over and shut down all further conversation. There is only so much abuse I can take in a day :)
So the end of the evening we went back down the road to a cozy little pub and had dinner. Carbonara was amazing!! and had a nice bottle of wine
 Our Paris adventure starts in ernest the next day!
Journey Begins
Vienna Day 1
Vienna Day 2
Vienna Day 3
Paris Day 1 (This Post)
Paris Day 2
We woke up a bit late on the morning we were to head to Paris so it was all hands to the main decks! We packed, crammed and stuffed. We hauled our stuff to the station, pulled out some more cash to pay for the apartment once we got to Paris and waited for our train to the airport.
Arriving at the airport we went to the British Airways line and waited... Like most dealings with these clowns there was no one there.
Little history here before we get into the fun. We were leaving Vienna and flying to London. We were then getting on another TICKET flight from London to Pairs. What this means is they don't check your bags through since it is two completely different tickets. However, I wanted to see if I could charm and wile my way into getting the bags routed through (All their systems are integrated together).
An hour and half before the flight they saunter up and open. They start jabbering about using this automated terminals but I have a special request! So I iggnored them and went up and said "Hello I would like..." And they cut me off saying I have to use the terminals. I tried to explain yes... I know but... TERMINALS! YOU MUST USE!.
Fine.... I'll do the damn terminals. Jabbing at them in anger and in random fashion the lady comes from behind the counter over to the terminal and punches all the stuff in for me...................................................................................................................... My blood is boiling. Its simmering away as she DOES HER JOB. Now I ask... what is the difference between her just doing that behind the counter and coming over to work the terminal?
So I snatch our boarding passes and get back in line. You didn't think I was going to give up on this bag transfer thing did you?
I get another lady since the first is off doing all the Self-Help terminals for other people :D
I give her my pass and start explaining I wanted our bags transferred to another flight and I tried to keep the ire out of my voice. She looked a bit dubious but started clicking away madly. I felt like I was in Meet the Folkers movie. She asked for paperwork and passports and continued to madly click away. Then out of the blue she hands over 4 boarding passes, takes our bags and puts the labels on to transfer them to Paris! Wow this lady was good! I looked at the boarding passes and she even issues our boarding passes from the other flight! Woot! I felt very grateful at this point.
Giving the Self-Help terminals one last dirty look we left for the plane.
Ohh you think it all ends here with us arriving in Paris without incident, think again my friend.
Arriving in the most hated of terminals and home of British Airways, Heathrow London. We didn't have to get our check-in luggage because that was kindly routed through for us but we still had to go through the ridiculous security again. We got into a massive line and waited... We got to the security area and some how this middle eastern fellow got between Kasey and I. She went through with her carry on and popped out the other side, the fellow before me went through and then my backpack and I went through.
Security stopped the fellow in front of me so I had to stop since I couldn't go around.
"Sir is this your bag" he asked the middle eastern fellow and he was holding up my backpack.
I said clearly "No that's my bag"
The fellow in front of me said "No" and the secuirty officer became louder and more aggressive saying "Sir is this your bag?!?!?" I more loudly said "No that is mine!" while the fellow in front kept saying no. The security officer started yelling at this fellow and I finally yelled back "ITS MINE!! My Bag, Not His MINE!"
Looking a little shocked he put my bag down and told me to wait over at the end. The middle eastern fellow left...
Ohh did I mention because of the efficacy and speed we now had 10 minutes before our flight left?
So I am waiting.. And waiting... no one is doing anything! I try to catch someones eye but nothing is working. Finally I said, in what I hopped was a kind but clear voice, "Excuse me, can someone check my bag I only have (Looks at clock) 8 minutes till my flight. Please". There was also a sign saying "If your going to to gate BLAH then make sure you have 10 minutes. Kasey saw the sign and ran off to find what gate. Returning of course to say it was the gate indicated on the sign.
A lady brings my bag over with a disgusted look on her face and says "We have to have a security officer go through it."
She comes back and said "Fine empty the bag into this box. We'll run it through again". 5 minutes till the plane leaves........
I start dumping shit out, NDS, snacks, MP3 Player, book and some more random crap. "There there, can you run that through please." 4 minutes to go.
They run the box of crap through and identified what was causing all the problems. A metal bookmark my mom gave me. This book mark has traveled through USA customs on at least six occasions, USA CUSTOMS, shoot you in the face customs, strip search and anal probe customs and these people pull me up on a book mark.
At this point they gave me a mini lecture about dangerous items.
GIMME THAT! Shit...
 Kasey and I didn't bother to put the dangrous items back into my backpack but loaded up our arms in one last look to her in a your a moron look and ran. RAN LIKE THE WIND. We ran like Harry Potter from Voldemort. We ran and ran and ran and just barely made it onto the plane.
Arriving in France our bags where there before we got off the plane ready for us and off we went! We grabbed train tickets (Cabs are for wusses) and headed into the heart of Paris.
It was about 9pm and we dragged our bags down some fantastic streets and past Notre Dame which due to the light rain the gargoyles were dripping water out of their mouths. What a sight!

Meeting up with the lady who we are renting the apartment from we headed to our place
(This photo was days later but it is the same street)


Here is a video of us going down the stairs and out into the court yard Click on Image to watch video
 |
| From VisMoot Paris |
After we got all our gear the American lady (ohh I forgot to mention that, she was super American, I am not sure she realized I was a fellow countryman!) began to explain how the light switches work and at the end asked if we knew how microwaves worked. Too much for me... I whipped out the cash handed it over and shut down all further conversation. There is only so much abuse I can take in a day :)
So the end of the evening we went back down the road to a cozy little pub and had dinner. Carbonara was amazing!! and had a nice bottle of wine

Subscribe to:
Posts (Atom)